
ChatGPT now lets you register your business. But before your profile is approved, you have to verify your business on ChatGPT by proving you own your website. For most businesses, that means adding one DNS record.
It sounds technical. It isn’t. Once you know where to click, it takes about five minutes.
We did it for Brightsand Designs on launch day. This guide shows the exact screens from our own cPanel and GoDaddy accounts, the steps for Cloudflare, Namecheap, Hostinger, Squarespace and Wix, and the one mistake that will stop your verification before it starts.
Haven’t registered yet? Start with part one of this guide: ChatGPT now lets you register your business. Here’s how.
The short version: Copy the TXT record ChatGPT Business Hub gives you. Add it where your domain’s DNS is managed, which is not always where you bought your domain. Save it, wait for it to take effect, then go back to Business Hub and continue verifying.
Where is your DNS managed? Choose your provider
Select where your domain’s DNS is managed to jump straight to your steps. Not sure? Read how to find out where your DNS is managed first.
Click your provider to jump to the steps:
What record does ChatGPT ask you to add?
When you register your business on ChatGPT, Business Hub asks you to verify that you own your website. One of the ways to do that is a DNS TXT record. Business Hub shows you three things to copy:
| Field | What to enter |
|---|---|
| Type | TXT |
| Name or host | The name or host shown in Business Hub |
| Value or content | The value shown in Business Hub |
Every DNS provider uses slightly different labels for these fields. The name might be called Name, Host or Host Name. The value might be called Value, Content, Record, Data or TXT value. They all mean the same thing.
What is a DNS TXT record?
Your domain has a set of settings, called DNS records, that tell the internet where your website and email live. A TXT record is a line of text stored in those settings.
TXT records are often used to prove you own a domain. Google, Microsoft and email providers use them for the same reason. Adding a new TXT record does not change where your website or your email points. It simply proves to ChatGPT that whoever controls your domain approved the claim.
What you need before you start
- Your ChatGPT Business Hub record. The name or host and the value, from the verification step in Business Hub.
- Access to your DNS. The login for wherever your DNS is managed: your hosting control panel, your domain registrar or a service like Cloudflare.
- About five minutes. Plus waiting time for the record to take effect.
Before you start: find out where your DNS is managed
This is the step most people get wrong. You must add the record where your DNS is managed. That is not always the company you bought your domain from.
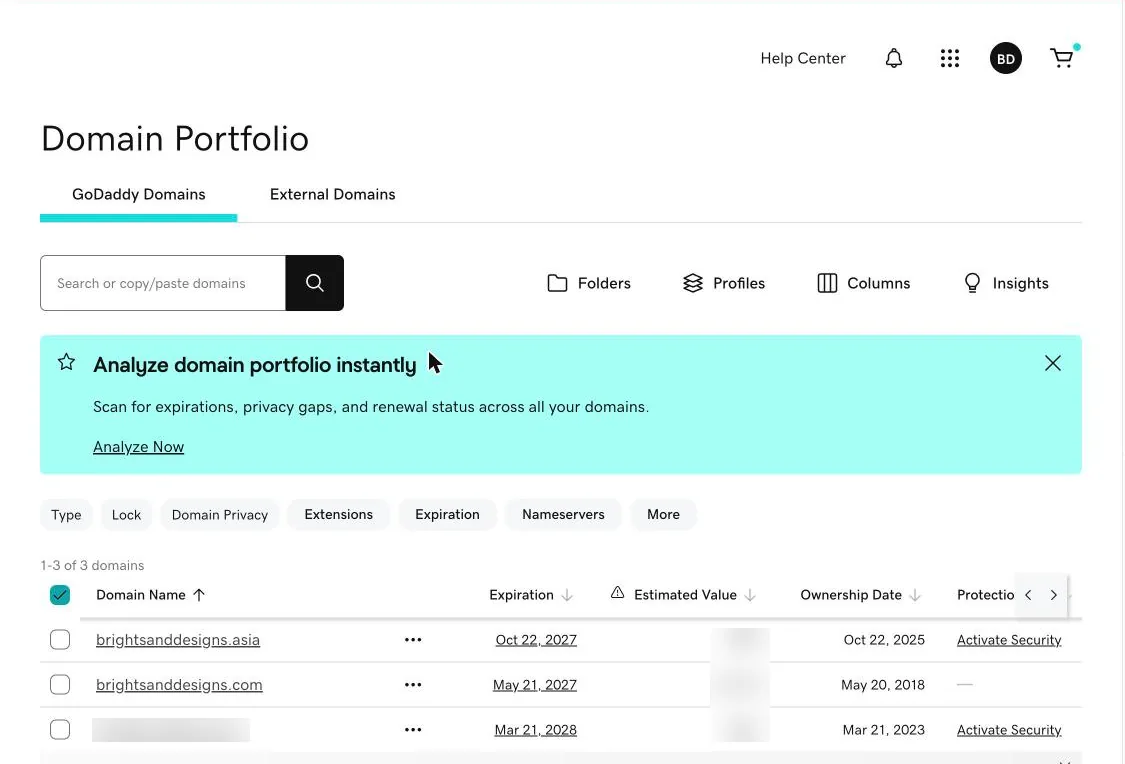
Our own domain is a good example. We bought brightsanddesigns.com through GoDaddy, but our DNS is managed by our hosting company, in cPanel. When we opened the DNS tab in GoDaddy, it told us so directly:
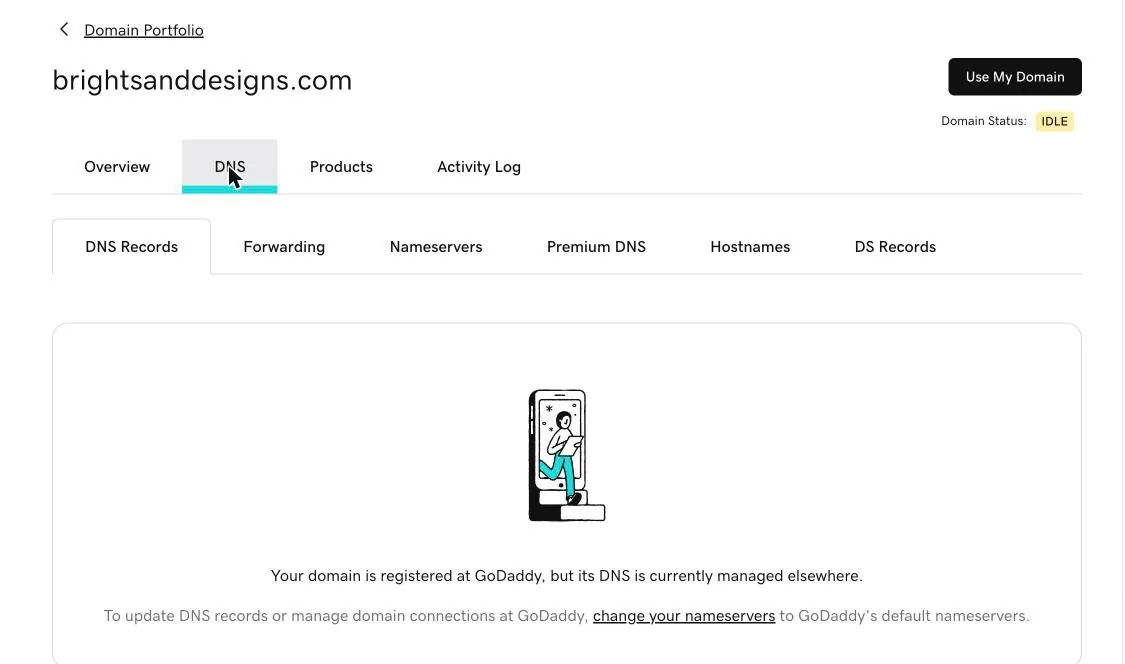
If we had added the record in GoDaddy, ChatGPT would never have found it.
How to check yours:
- Check your registrar first. Open your domain in the account where you bought it. If it says your DNS is managed elsewhere, or that you are using custom or external nameservers, add the record at your hosting company or DNS provider instead.
- Look at your nameservers. Your nameservers usually name the company that manages your DNS. In cPanel, the Zone Editor lists them at the top of your zone records.
- Ask. If someone else manages your website or hosting, ask them where your DNS is managed. It is a one-line answer for them.
How to verify your business on ChatGPT in cPanel
Many hosting companies give you cPanel to manage your website, email and DNS. Our host, FastComet, is one of them. These are our own screens.
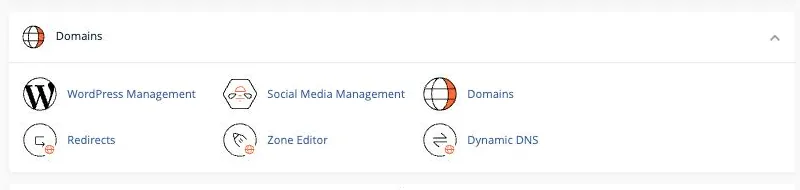
Step 1: Open Zone Editor
Log in to cPanel. In the Domains section, select Zone Editor.
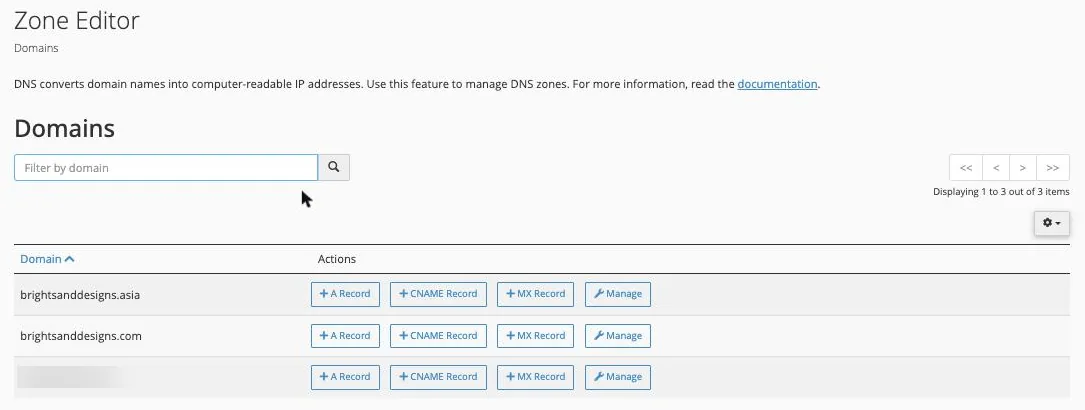
Step 2: Select Manage next to your domain
Zone Editor lists your domains. Select Manage next to the domain you are verifying.
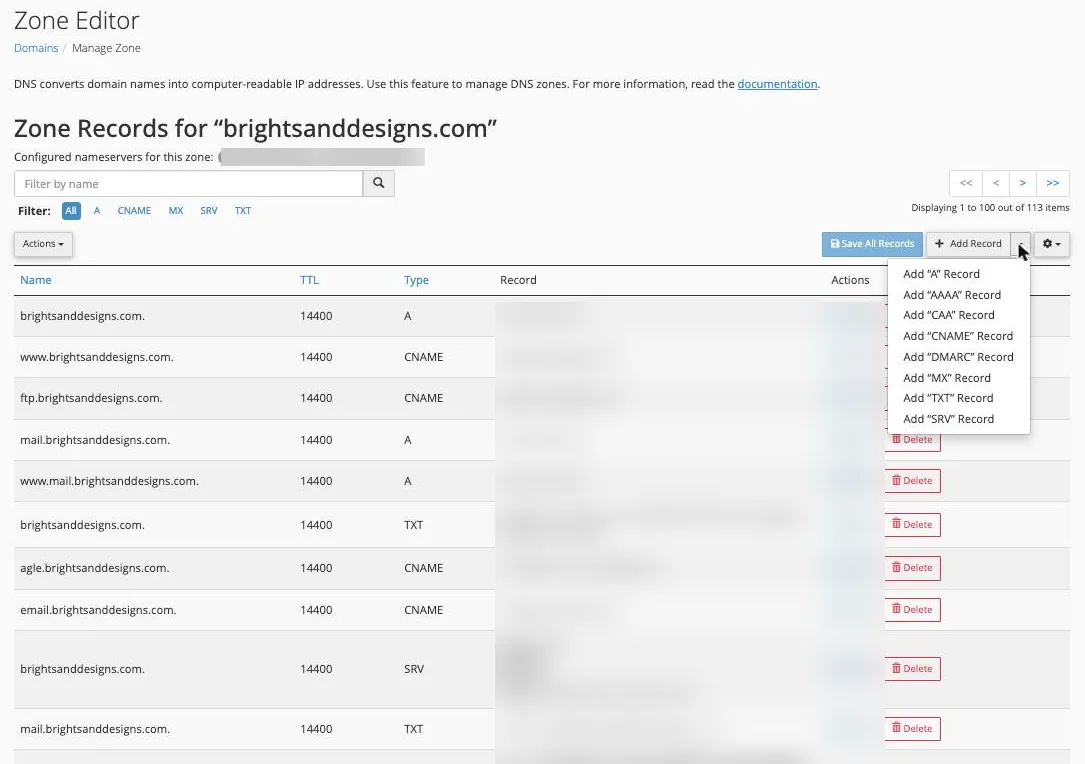
Step 3: Choose Add “TXT” Record
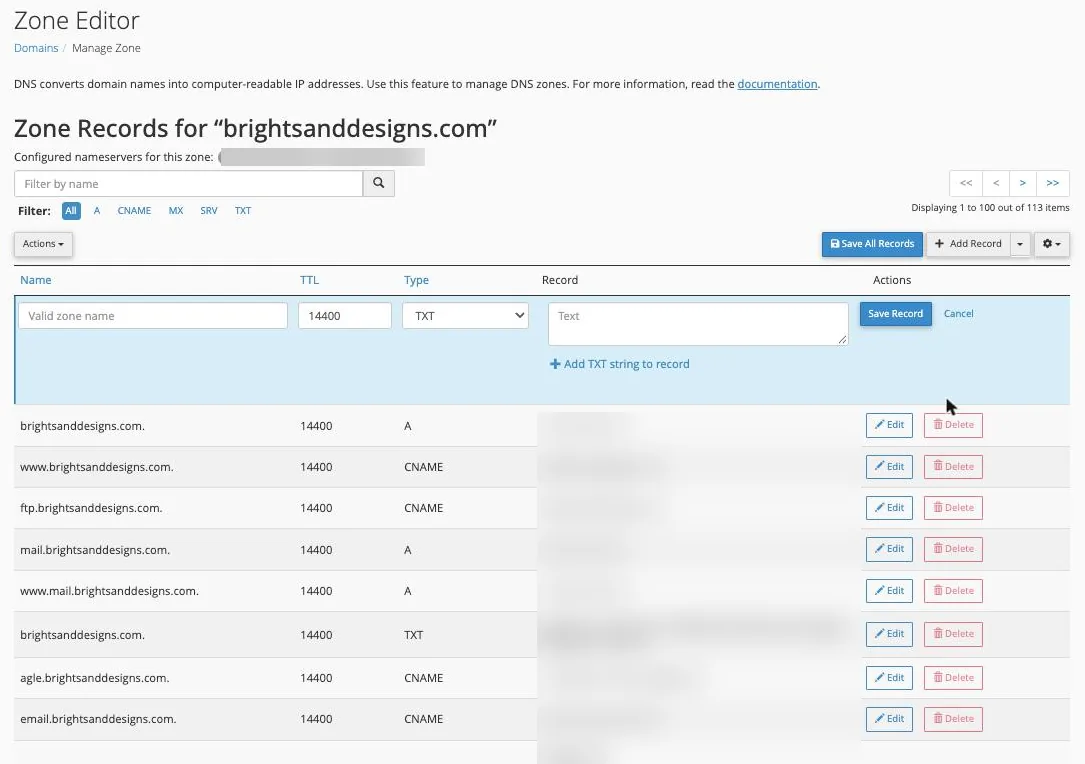
On the Zone Records page, select the small arrow next to Add Record, then choose Add “TXT” Record.
Step 4: Fill in the record
A new row opens at the top of your records. Fill it in:
- Name: the name or host from Business Hub.
- TTL: leave the default.
- Type: TXT is already selected.
- Record: paste the value from Business Hub, exactly as shown.
Check the Name field. After you click out of it, cPanel shows the full name. Make sure your domain appears only once at the end, not twice.
Step 5: Select Save Record
Select Save Record. Leave your other records exactly as they are. Do not edit or delete existing TXT records, such as Google verification or email records.
Prefer the official guide? See cPanel’s official Zone Editor guide.
How to verify your business on ChatGPT in GoDaddy
Use these steps only if your DNS is managed at GoDaddy. If the DNS tab shows the “managed elsewhere” message, use your hosting company’s DNS settings instead.
Step 1: Open your domain
Sign in to GoDaddy and go to your Domain Portfolio. Select the domain you are verifying.
Step 2: Open DNS and select Add New Record
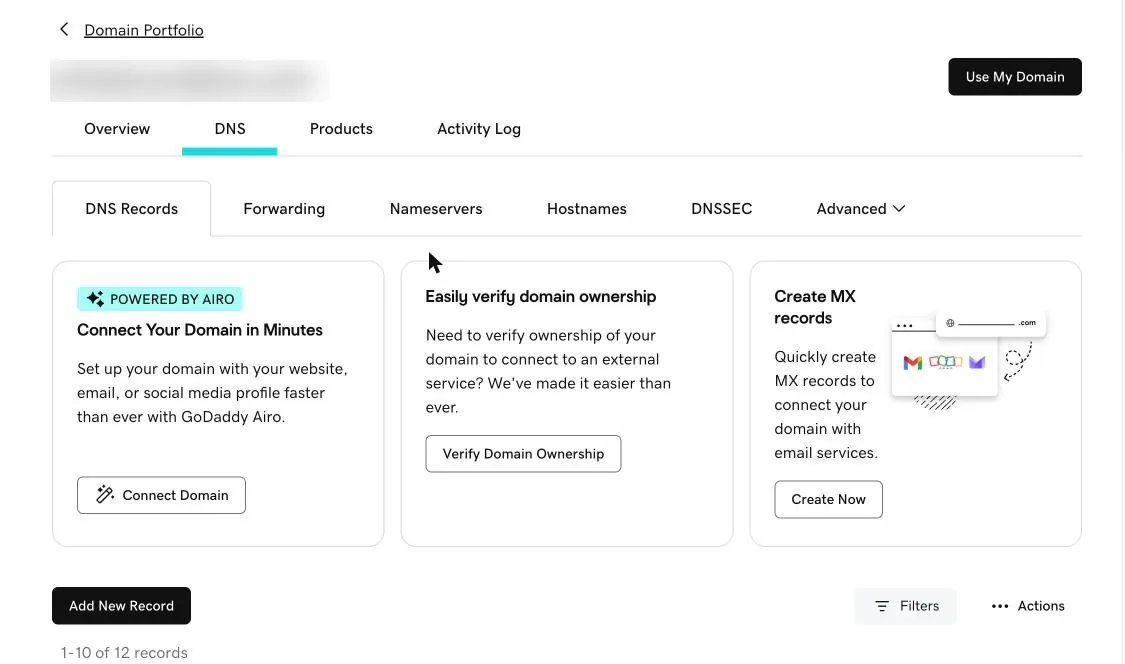
Select the DNS tab, then Add New Record.
Step 3: Choose TXT and fill in the record
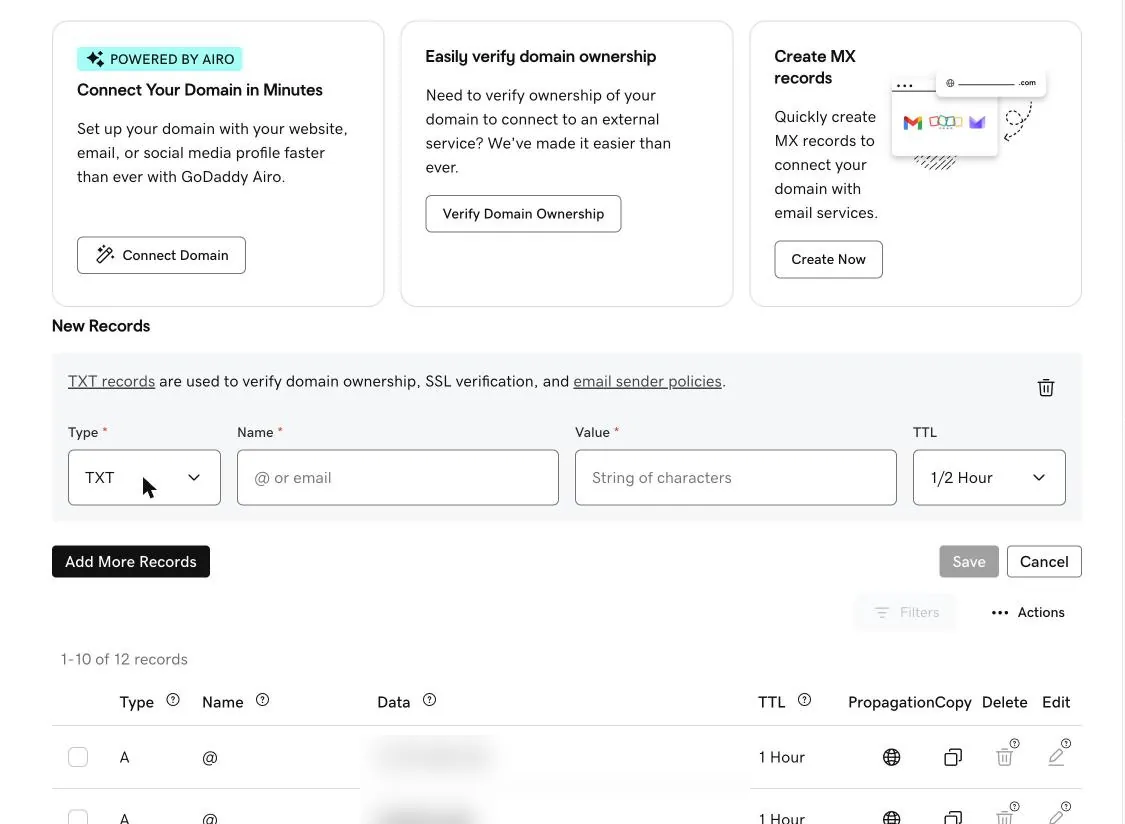
Set Type to TXT. GoDaddy notes on this screen that TXT records are used to verify domain ownership. Then fill in the record:
- Name: the name or host from Business Hub, without your domain at the end. GoDaddy adds your domain for you. Use @ only if Business Hub asks for your root domain.
- Value: paste the value from Business Hub, exactly as shown.
- TTL: leave the default.
Step 4: Select Save
Select Save. If your domain has GoDaddy Domain Protection, GoDaddy may ask you to confirm your identity first. GoDaddy says most DNS changes take effect within an hour, but can take up to 48 hours.
Prefer the official guide? See GoDaddy’s official guide: Add a TXT record.
How to verify your business on ChatGPT in Cloudflare
If your domain uses Cloudflare’s nameservers, your DNS is managed in Cloudflare, even if you bought the domain somewhere else.
- Log in to the Cloudflare dashboard and select your domain.
- Go to DNS, then Records.
- Select Add record.
- Set Type to TXT.
- In Name, enter the name or host from Business Hub. Cloudflare adds your domain for you, so leave it off the end.
- In Content, paste the value from Business Hub.
- Leave TTL on its default and select Save.
Prefer the official guide? See Cloudflare’s official guide: Create DNS records.
How to verify your business on ChatGPT in Namecheap
These steps work when your Namecheap domain uses Namecheap’s BasicDNS, PremiumDNS or FreeDNS. If your domain points to Namecheap web hosting, add the record in your hosting cPanel instead, using the cPanel steps.
- Sign in to Namecheap and select Domain List.
- Select Manage next to your domain.
- Open the Advanced DNS tab and select Add new record.
- Set Type to TXT Record.
- In Host, enter the name or host from Business Hub, without your domain at the end. Use @ only for your root domain.
- In Value, paste the value from Business Hub.
- Select Save all changes.
Namecheap says new records usually take about 30 minutes to take effect.
Prefer the official guide? See Namecheap’s official guide: How do I add TXT records for my domain?.
How to verify your business on ChatGPT in Hostinger
If your domain uses Hostinger’s nameservers, add the record in Hostinger’s DNS Zone Editor. If your domain uses another company’s nameservers, Hostinger lets you save the record, but it won’t work until your nameservers point to Hostinger.
- Log in to Hostinger and open the DNS Zone Editor for your domain.
- Choose TXT as the record type.
- In Name, enter the name or host from Business Hub. Use @ only for your root domain.
- In TXT value, paste the value from Business Hub.
- Leave TTL on its default and add the record.
Hostinger says DNS changes can take up to 24 hours to fully take effect.
Prefer the official guide? See Hostinger’s official guide: How to manage TXT records.
How to verify your business on ChatGPT in Squarespace
You can add DNS records in Squarespace only if your domain is registered with Squarespace or connected to it through its nameservers. Otherwise, add the record with your domain provider.
- Open your Squarespace domains dashboard and select your domain.
- Select DNS.
- Add a new custom record and set the Type to TXT.
- In the name field, enter the name or host from Business Hub.
- In Data, paste the value from Business Hub.
- Save the record. Squarespace may ask for your password to confirm.
Squarespace says DNS changes can take 24 to 48 hours to update.
Prefer the official guide? See Squarespace’s official guide: Adding DNS records to your domain.
How to verify your business on ChatGPT in Wix
These steps work when your domain uses Wix’s nameservers. If your domain is connected to Wix by pointing, add the record with your domain host instead.
- Go to the Domains page in your Wix account.
- Select the Domain Actions icon next to your domain, then Manage DNS Records.
- In the TXT section, select + Add Record.
- In Host Name, enter the name or host from Business Hub. If you are told to use @, leave it blank.
- In Value, paste the value from Business Hub.
- Select Save.
Prefer the official guide? See Wix’s official guide: Adding or updating TXT records.
My DNS is somewhere else. How do I verify?
Every DNS provider works the same way, even if the buttons have different names. Look for these steps:
- Open the DNS settings, DNS records or zone editor for your domain.
- Add a new record and choose TXT as the type.
- Paste the name or host from Business Hub into the name or host field. If your provider adds your domain automatically, leave your domain off the end.
- Paste the value from Business Hub into the value, content or data field.
- Leave the TTL on its default and save.
After you add the record: go back to ChatGPT Business Hub
Once the record is saved, return to Business Hub and continue the verification step.
If it doesn’t verify straight away, give it time. DNS changes need time to take effect. Don’t add the record a second time.
After the website check, Business Hub asks the person managing the profile to verify their identity with a government-issued ID. That is where Brightsand is now: our profile is created, and we are waiting to be approved.
How long does it take to verify your business on ChatGPT?
Adding the record takes about five minutes. Waiting for it to take effect depends on your provider. This is what each provider says in its own help pages:
| Provider | How long DNS changes take |
|---|---|
| GoDaddy | Usually within an hour, up to 48 hours |
| Namecheap | About 30 minutes |
| Hostinger | Up to 24 hours |
| Squarespace | 24 to 48 hours |
| cPanel, Cloudflare, Wix | Depends on your settings. Try verifying after an hour. |
After the record works, Business Hub still reviews your identity, which takes a few days.
Verification failed? How to fix it
- Wait and try again. The most common reason is that the record hasn’t taken effect yet.
- Check where you added it. If your registrar says your DNS is managed elsewhere, the record is in the wrong place.
- Check the Name field. If your domain appears twice in the full name, delete the record and add it again with only the part before your domain.
- Check the value. Copy it again from Business Hub. No extra spaces, line breaks or quotation marks.
- Make sure you saved it. Some providers, like Namecheap, need a final save step after you add the record.
Common mistakes to avoid
- Adding the record in the wrong place. Add it where your DNS is managed, not just where you bought your domain.
- Doubling your domain in the Name field. If your provider adds the domain automatically, enter only the part before it.
- Changing the value. Copy it exactly as Business Hub shows it.
- Editing your existing records. Add a new record. Leave the rest alone.
- Sharing the value. If you ask someone for help with a screenshot, hide the values first.
Quick answers
Will adding a TXT record break my website or email?
Adding a new TXT record does not change where your website or email points. Just don’t edit or delete the records you already have.
Do I have to use the DNS method to verify my business on ChatGPT?
No. Business Hub shows you the verification methods available for your business. We used the DNS record because it proves you own your domain directly.
Can I remove the record after I’m verified?
OpenAI hasn’t said. We are leaving ours in place.
Can my web developer or agency do this for me?
Yes. Whoever manages your DNS can add the record. You still complete the identity check in Business Hub yourself, with your own government-issued ID.
I have more than one domain. Which one do I verify?
The domain of the website you entered in Business Hub. That is the one ChatGPT checks.
The bottom line
To verify your business on ChatGPT, you need one record in the right place. Find out where your DNS is managed, add the TXT record there, and go back to Business Hub.
New to all of this? Start with our guide: ChatGPT now lets you register your business.
Want it done for you? Our team will register your business on ChatGPT, add the verification record, and align your facts across every platform.

Related Posts

ChatGPT now lets you register your business
ChatGPT now lets you register your business. We signed Brightsand up on launch…


Evergreen Content: Why It Matters for SEO and Traffic
Evergreen content can keep attracting readers long after it is published. Learn…


How to Show Your Company in ChatGPT: The Ultimate Guide to Getting Found in AI Conversations (2025)
Learn how to get your business mentioned in ChatGPT by optimizing your content,…
[…] Want the exact clicks? Follow our step-by-step guide: How to verify your business on ChatGPT in cPanel, GoDaddy and more. […]